How Do I Email From Cashflow Manager?
How do I email from Cashflow Manager?
Cashflow Manager offers two main ways to send emails via the program:
- Sending through your desktop email program (e.g. Outlook)
- Sending through your web email client
To get started, open up your business in Cashflow Manager, select the [File] menu, and select [Email Settings].
1. How do I connect my desktop email program?
If you have a desktop email program (e.g. Outlook) installed on your computer and would like to use it, keep the [Use Installed Email Client] selected and just click [Save].
To ensure this is fully set up:
- Click on the [Windows Start] button in the bottom left corner of your screen.
- Select [Settings].
- Select [Default Apps] on the left-hand side.
- Ensure that Outlook is selected under the Email option - For v14 both Classic & New Outlook can be used. Only New Outlook can be used in v12.
- Restart the Computer.

Please Note: Cashflow Manager applications cannot connect with the Windows Mail App
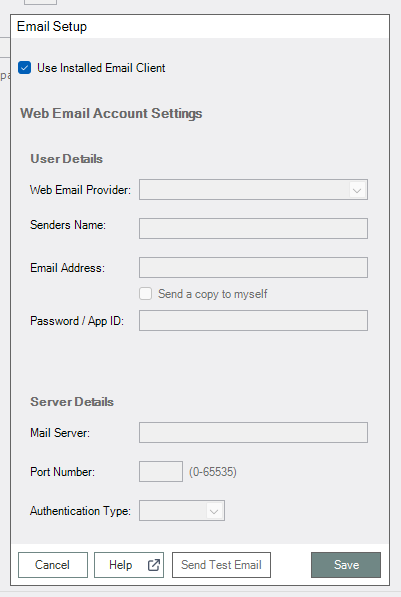
2. How do I connect my web client email account?
- Untick the [Use Installed Email Client] option. Then fill in the fields below:
- Select your [Web Email Provider] from the dropdown menu.
- Note: Bigpond email users should select Telstra
- Enter your name or business name in the [Senders Name] field. This will appear in the ‘From’ address of your emails.
- Enter your [Email Address]
- Select [Send a copy to myself], if you would like to send a copy of all emails to your own inbox.
- Enter the Password* / App ID for your email account:
- Gmail: App ID (click here to learn how to generate an App ID )
- Hotmail: Current email password
- Telstra/Bigpond: Current email password
- Other: This may require either your email password or an App ID. We recommend contacting your email service provider. - Click [Save] and [Send Test Email] if you would like to check for the correct setup.
Please note:
- The Server Details (Mail Server, Port Number, and Authentication Type) will be automatically filled in when you select your Web Email Provider.
- If your Web Email Provider is not on the list and you selected Other, you will need to find the Mail Server contacting your email provider.
- The Port Number, and Authentication Type will be set to 465 and SSL by default as these are the most common settings, but you can update them if it is needed.
Related Articles
How to Generate an App Password to send emails through Gmail
To set up your Gmail account to send emails through Cashflow Manager, you need to generate an app password, by following these steps: 1. Log in to your Google account 2. Click on [Security] on the left-hand side 3. Click [2-Step Verification] 4. ...Uninstalling Cashflow Manager
Windows 10 1. Click on the [Start] button 2. Select [Settings] 3. Select [System] 4. Select [Installed Apps] 5. Click on [Cashflow Manager] 6. Click on [Uninstall] Windows 11 1. Click on the [Start] Button 2. Select [Settings] 3. Click [Apps] 4. Go ...How to Download and Install Cashflow Manager
Downloading and Installing Cashflow Manager software If you already have a Cashflow Manager icon pinned to your desktop or task bar, please remove it before downloading. 1. To download the software, visit the Cashflow Manager Downloads Centre here. ...How Do I Run Cashflow Manager on an Apple Mac?
Cashflow Manager is a Windows-based program. However, MacBook, MacBook Pro, Mac Mini and iMac computers can run the Windows PC platform via the following two methods. Option 1: For the budget-conscious: Using software called “Boot Camp”, which can be ...How to Restore my Backup File?
Generally, you will only need to restore a file if something has happened to your existing file such as a corruption, a virus, or you are re-installing Cashflow Manager on a new computer. To restore your backup file: Open Cashflow Manager and click ...
Popular Articles
Payday super: What you need to know to get setup in Cashflow Manager
You must be on version 14.3.3 or later to be able to report Qualifying Earnings and receive the new tax rate changes. Click here to download the latest version. What is Payday Super Payday Super changes the way employers must pay superannuation ...Single Touch Payroll Guide
As a subscriber of Cashflow Manager, all fees involved with lodging your records via Single Touch Payroll are included with your Cashflow Manager Gold, Wages Manager or Wages 1-4 subscription fee. If you have any questions regarding Single Touch ...Converting your Version 12 business file to Version 14
Summary If you're updating from Version 12 to Version 14, you will need to convert your business file to the new format. Fortunately, this is easily done by first creating a new back-up of your Version 12 Business File, then converting it to the new ...Completing your EOFY payroll
Finalising your year-end payroll It's important to note the final pay period for the financial year is the one that is PAID before the end of the financial year. The first pay period of the next financial year is the first one that is PAID during the ...Starting a New Financial Year in Wages
You can start a new financial year by following the below steps: 1. In the Employees section of Wages, select [Tools] in the top left 2. Select [Financial Year] 3. Select [Start New Financial Year] 4. The financial year ending will read 202X, select ...